
Saturday, May 15, 2010
Brayering and Awash With Flowers
Tuesday, May 11, 2010
For the Graduating Girls
 My daughter has some of the sweetest friends! I chose a color that reminded me of each of them, and then put the combo together to create this graduation card. I used some diecuts for the vines behind the flowers. They were painted with pigment/Kraft ink, and then embossed. It was really fun! I had some flowers laying around that I've been wanting to use up and these were perfect. I could have also colored flowers from an SU! Pretties Kit and accomplished the same thing. The organza ribbon and pretties kit products can be dyed with ink or markers to match ANY project. Awesome!
 Colors used: Bashful Blue, Old Olive, Barely Banana and Cameo Coral. Stamps: Happy Grad

I cut the 'pocket' 1 inch wider than the card, and a 1/2 an inch taller than I wanted. I used a score-pal to create fold lines on the sides and bottom 1/2 an inch from the three edges. I cut the small squares off of the two corners, and then cute the flaps diagonally so when folded against the pocket they would lay flat. I adhered the background paper first, and the pocket on top after applying the flower with a centered brad. The leaves are from the new bird punch by Stampin' Up!. I punched two from the design paper, and then cut off about an inch of the stem before adhering them behind the flower. The sentiment above is an old irish blessing, fitting for a graduate just starting out in the world!
I hope you can use some of these tips in your own creations. Feel free to contact me with any questions and make it a great day!
The front of this card was inspired by Kimberley Eklund here:
 Happy Stamping Everyone! I'll have a card using Stamping Pastels tomorrow!
Monday, May 10, 2010
Masculine Birthday, Medallion Style!
My friend invited me to participate in a card swap. 20 masculine cards, 20 feminine cards, and each participant gets one of each. Sounds easy and fun to me!
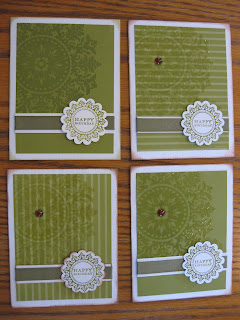 These are my masculine cards. The top left corner is stamped in old olive and NOT heat embossed. The other three are heat embossed with versamark only. I played with the old olive design paper pack, and stamped across both vertical and horizontal lines, just to see what I liked better. I think I like the upper right better. Which do you prefer?
The ribbon, I believe, is Garden Green or Mellow Moss. I wanted to go all monochrome, but couldn't find my Old Olive ribbon, lol! The Vintage Labels were also heat embossed with versamark and old olive, and then punched out with the large scallop punched and popped up with dimensionals. The card front was attached to textured whisper white cardstock, and sponged with Close to Cocoa around the edges.
This is the last of my week of masculine cards! Coming up are some feminine graduation cards, simple 3 x 3 thank you notes inspired by Dawn Griffith, and the set of feminine cards for the above referenced card swap.
Happy Stamping!
Saturday, May 8, 2010
Sunshine Awards!

So I understand there are a few rules in receiving this particular award, so read on:
1. Put the Sunshine Award on your blog and/or within your post.
2. Pass the award to 12 other bloggers.
3. Link the nominees within your post.
4. Let them know they received this award by leaving a comment on their blog.
5. Share the love and link to the person from whom you received the award.
Each morning, after brewing coffee and feeding the pets, I enjoy my morning coffee by surfing crafting blogs! It's like I get to say "good morning!" to all my cyber friends, and enjoy their wonderful artistry. There are a few blogs that I go to very regularly. A few of those great crafters had already received this award. Here is my list:
1. Michelle Zindorf http://zindorf.blogs.splitcoaststampers.com/
2. Michele Reynolds http://inspirationink.typepad.com/inspiration-ink/
3. Karen Barber http://karenbarberstamps.blogspot.com/2010/04/home-sweet-ohio-home.html
4. Dawn Griffith http://dawnsstampingthoughts.typepad.com/dawns_stamping_thoughts/
5. Lynn Pratt http://stampndesign.blogspot.com/
6. Ilina Crouse http://ilinacrouse.blogspot.com/
7. LeAnn Greff http://flowerbug.typepad.com/my_weblog/
8. Joann Travis http://www.sleepyinseattle.net/
9. Laurie Schmidlin http://justgivemestamps.typepad.com/
10. Jeannie Phillips http://www.aplaceformycards.blogspot.com/
11. Kriss Huels http://stampwithkriss.com/
12. Lynn Put http://thequeensscene.blogspot.com/
Please go visit these blogs and leave a comment - it will be a li'l ray of sunshine and time well spent!
Hello, Stampers and Crafters!
I just got back from teaching a spin class and want to get today's card posted before I volunteer at Utah's Bikes for Kids cycling event. We give away 1,000 bikes to 1,000 underpriviliged children. It always proves to be a rewarding day!
I cased this (yet another) graduation card from Michele Reynold's site here:
http://inspirationink.typepad.com/inspiration-ink/2010/05/more-one-layout-and-color-scheme-ideas.html
 I needed something quick and masculine and her idea was awesome. That's the Tip of the Day: Don't be afraid to case, just give credit where credit is due! You don't have to re-invent the wheel, or 'card' as it were. It's an honor to have someone think enough of your ideas to want to share them with their friends and loved ones. So Michele, thanks for the card idea and on a side note (thanks for the stamps - they came in the mail yesterday!)
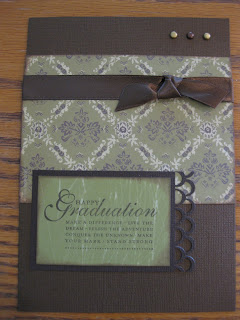
I'm using these cards as money-holders, so here's what I did for the inside:
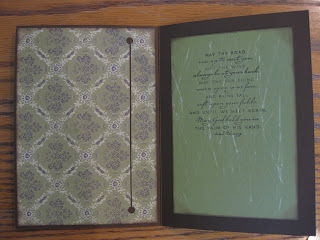
Did you know that money/bills are 6 1/8 inches long and 2 5/8" wide? Well, they are! For this 5 x 7 card, I used a pencil to mark 1/4" in from the top and bottom, and 1 1/2" from the left. That's where I punched each hole using a standard hole punch. Then I used my x-acto craft knife and cut a slit from hole to hole. I moved my metal rule over just a smidge (I know, so technical) and cut again, creating a thin 'slot.' I then used SU's snail adhesive for a full inch wide on the long edges and 1 adhesive length on the short edges. This creates a strong bond and a 6 1/2 " by 3" pocket for cash! Perfect! Other products used are: Baroque DP available at the Clearance Rack (see the banner above), Chocolate Chip card stock, Happy Grad stamp, Chocolate Chip 5/8" ribbon and classic ink, and misc. brads and edge punch. Any of SU's edge punches will work beautifully here! Thanks for checking out today's card! Tomorrow I'll post my masculine card from my upcoming card swap. Hope you've liked this week's Masculine Cards!
I just got back from teaching a spin class and want to get today's card posted before I volunteer at Utah's Bikes for Kids cycling event. We give away 1,000 bikes to 1,000 underpriviliged children. It always proves to be a rewarding day!
I cased this (yet another) graduation card from Michele Reynold's site here:
http://inspirationink.typepad.com/inspiration-ink/2010/05/more-one-layout-and-color-scheme-ideas.html
 I needed something quick and masculine and her idea was awesome. That's the Tip of the Day: Don't be afraid to case, just give credit where credit is due! You don't have to re-invent the wheel, or 'card' as it were. It's an honor to have someone think enough of your ideas to want to share them with their friends and loved ones. So Michele, thanks for the card idea and on a side note (thanks for the stamps - they came in the mail yesterday!)
 I'm using these cards as money-holders, so here's what I did for the inside:

Did you know that money/bills are 6 1/8 inches long and 2 5/8" wide? Well, they are! For this 5 x 7 card, I used a pencil to mark 1/4" in from the top and bottom, and 1 1/2" from the left. That's where I punched each hole using a standard hole punch. Then I used my x-acto craft knife and cut a slit from hole to hole. I moved my metal rule over just a smidge (I know, so technical) and cut again, creating a thin 'slot.' I then used SU's snail adhesive for a full inch wide on the long edges and 1 adhesive length on the short edges. This creates a strong bond and a 6 1/2 " by 3" pocket for cash! Perfect! Other products used are: Baroque DP available at the Clearance Rack (see the banner above), Chocolate Chip card stock, Happy Grad stamp, Chocolate Chip 5/8" ribbon and classic ink, and misc. brads and edge punch. Any of SU's edge punches will work beautifully here! Thanks for checking out today's card! Tomorrow I'll post my masculine card from my upcoming card swap. Hope you've liked this week's Masculine Cards!
Friday, May 7, 2010
More from the Summer Mini
Here we go with more graduation cards for my daughter and her friends. This one, Go Graduate, from the summer mini catalog had everything I needed: An image, another image to create my background paper, and a sentiment. Perfect! This set can be purchased by clicking the image of the Summer Mini Catalog at the right. I used very basic suppies here.... just paper and stamping, plus a little embossing powder and versamark to make the main image and sentiment pop. Whisper White, Black and Glorious Green are the main colors, with Blush Blossom for skin coloration. Blender pens were used on the gowns. Colors from the Brights family were used for clothing colors. Best of luck to YOUR graduates, and happy creating!


Thursday, May 6, 2010
Happy Graduation from the Summer Mini!
My daughter and several of her friends are graduating from high school this June, so it's a perfect opportunity to use the new Graduation stamps, Go Graduate and Happy Graduation from the new summer mini catalog.
I had a great time masking, embossing, spraying and coloring this card for my sweet girl!
 You can make this card too! Any questions about these techniques, please let me know and I'll blog about them! Happy Stamping!
I had a great time masking, embossing, spraying and coloring this card for my sweet girl!

Wednesday, May 5, 2010
Aloha!

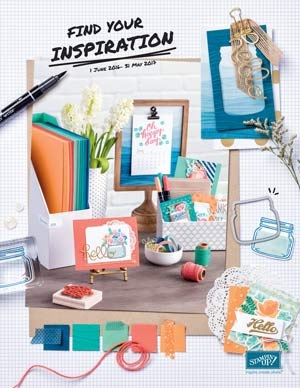
Click this link to check out the .pdf file for the Summer Mini (it's at the bottom of the page) or any of the Stampin' Up! catalogs:
Stamin' Up! 2010 Summer Mini
Click the Summer Mini Catalog at the right to order any products your creative heart desires!
I'll be posting some of my own creations from the products available in this catalog, so come back and visit me again! Thanks for stopping by and make it a great day!
Tuesday, May 4, 2010
Mojo Monday 137 ... My Sample

I pulled out some retired design paper from SU, along with the Haiku DP pack I purchase on clearance at SU. I love the clearance rack! You can shop at the clearance rack by clicking the "Order Onine 24/7" button to the right >>>>>>>>>>
I used Whisper White in 1 1/2" squares to clear emboss the Hibiscus image twice before brayering Close to Cocoa over each square. Tip: When doing the emboss resist technique, be sure to wipe of your embossed image when brayering is complete. Then, re-heat the image and your image will be shiny again. Cool!
I embossed the two main images and then colored the double hibiscus with copics. Another Tip: A great way to align clear stamps is to lay them out on your paper first, then press your clear block to the stamps. I can't tell you how long I stuck the stamps to the blocks first, then tried to align them before realizing there was an easier way.
I'll be looking for your creations from the clearance rack at Stampin' Up!. Make it a great day!
Mojo Monday 137

Julee has again created a fun sketch for us! The first week of the month brings a special blog candy for Mojo Monday. Woohoo! Play along with me! Here's the sketch:
I'll post my card in my next entry...
Monday, May 3, 2010
Workin' on it...
I'm making some slow progress with this blog, with the help of my hubby and dear friend, Chelsea. I'm looking forward to receiving My Digital Studio from Stampin' Up so I can update this blog with Stampin' Up images. They're gorgeous so I can hardly wait!
I've been busy this weekend with a card swap of 20 masculine birthday cards which I will post, along with finishing these Mother's Day cards:
http://www.splitcoaststampers.com/gallery/photo/1692672?&cat=500&ppuser=219900
Next blog lesson: How to post a picture in a blog entry, instead of a link!
More later..... be happy and well!
Subscribe to:
Posts (Atom)